
This post covers the following:
- Converting TensorFlow model (MobileNetV3) into TensorFlow.js
- Creating a web app with React which allows users to upload images for image classification
- Hosting web app on GitHub Pages
Converting TensorFlow SavedModel into TensorFlow.js
Although tensorflow.js provides built-in functions to load certain pre-trained models directly, we will go through the conversion steps to provide a general guideline that will be applicable for other custom models. For simplicity, a pre-trained MobileNetV3Large model will be used where it was trained with over 1million images and 1000 classes from the ImageNet dataset.
With TensorFlow installed, create a Python file and run the following:
from pathlib import Path
import tensorflow as tf
model = tf.keras.applications.MobileNetV3Large(input_shape=(224, 224, 3))
export_path = Path.cwd() / "saved_models" / "MobileNetV3Large"
model.save(export_path)
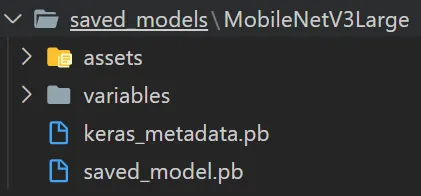
The SavedModel containing the following files should be available in the export path folder.
Install the converter:
pip install tensorflowjsThe following command converts the TensorFlow SavedModel into TensorFlow.js Graph Model. Replace the input_path with the saved_model location (“./saved_models/MobileNetV3Large” for our case) and the output_path for the converted files.
In the same directory as the python file earlier, run the following in PowerShell terminal. Replace the ` with ^ if you are running the command in cmd. Visit here for the converter documentation.
tensorflowjs_converter `
--input_format=tf_saved_model `
--output_format=tfjs_graph_model `
./saved_models/MobileNetV3Large `
./tfjs/MobileNetV3Large
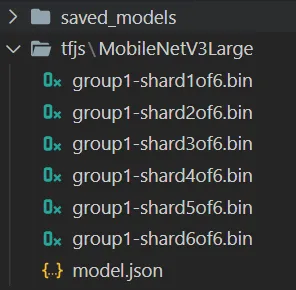
Once the conversion is complete, you should see a file called model.json together with some sharded bin files in the output directory as follow:
Create React app
One of the easiest ways to create a new react app is via the “create-react-app” command. This requires Node to be installed on your system. More info on create-react-app can be found here.
Run the following in a terminal:
npx create-react-app tfjs-mobilenetv3After installation, a new project folder called “tfjs-mobilenetv3” can be found inside the current directory containing all the files for our base app.
Libraries such as MUI and dropzone will be used to build our user interface. Cd into the new project folder and install additional dependencies:
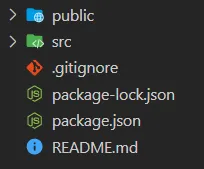
cd tfjs-mobilenetv3npm i @tensorflow/tfjs @mui/material @emotion/react @emotion/styled material-ui-dropzone @material-ui/core @material-ui/iconsCopy the “tfjs/MobileNetV3Large” folder containing all the TensorFlow.js model files into the public folder of our project so that it will be included during the build. The project folder should look like this:
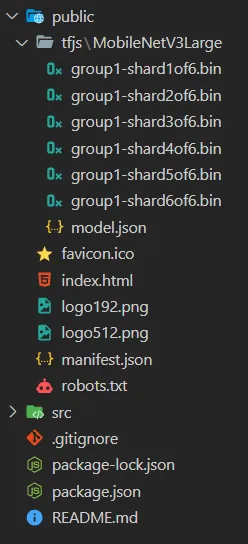
Navigate to App.js file within the src folder and delete the majority of the code as we will be creating our own interface. The App.js file should look like below after the cleanup.
function App() {
  return;
}

export default App;
Hooks such as useState and useEffect will be used to store variables and fetch data on the first render. Import dependencies:
import React, { useState, useEffect, Fragment } from "react";
import * as tf from "@tensorflow/tfjs";
TensorFlow.js provides two different methods of loading models depending on the type of the model. As we converted our model into a graph model in the previous section, tf.loadGraphModel function will be used to load the model. The model URL represents an HTTP endpoint that serves the model files. This requires the converted TensorFlow.js model files to be hosted somewhere on the internet (e.g. Google Cloud Storage, Amazon S3, etc.).
For our case, since we have copied the model files into our public folder, we can simply put the model_url as the path to our model.json file in the public folder for example “tfjs/MobileNetV3Large/model.json”. This will be resolved into “{hosting_url}/tfjs/MobileNetV3Large/model.json”.
Anishathalye has provided simpler human-readable labels for ImageNet on GitHub which is what we will use as the display label for our model.
An empty array was also added as the second argument of useEffect which tells React to run the code inside useEffect only once after the initial render. Code inside App function:
const [model, setModel] = useState(null);
const [classLabels, setClassLabels] = useState(null);

useEffect(() => {
  const loadModel = async () => {
    const model_url = "tfjs/MobileNetV3Large/model.json";

    const model = await tf.loadGraphModel(model_url);

    setModel(model);
  };

  const getClassLabels = async () => {
    const res = await fetch(
      "https://raw.githubusercontent.com/anishathalye/imagenet-simple-labels/master/imagenet-simple-labels.json"
    );

    const data = await res.json();

    setClassLabels(data);
  };

  loadModel();
  getClassLabels();
}, []);
Initialize additional state variables that will be used in our components.
const [loading, setLoading] = useState(false);
const [confidence, setConfidence] = useState(null);
const [predictedClass, setPredictedClass] = useState(null);
DropzoneArea component will be used to simplify the image upload process where users will be able to drag and drop images onto the dropzone. The prediction and confidence will be displayed in the form of React Chip component. A backdrop component was also used to show a loading spinner while the model is performing inference and prevents users to upload new images before completion.
Import additional dependencies:
import { DropzoneArea } from "material-ui-dropzone";
import { Backdrop, Chip, CircularProgress, Grid, Stack } from "@mui/material";
We return the following for our App function:
return (
  <Fragment>
    <Grid
      container
      className="App"
      direction="column"
      alignItems="center"
      justifyContent="center"
      marginTop="12%"
    >
      <Grid item>
        <h1 style={{ textAlign: "center", marginBottom: "1.5em" }}>
          MobileNetV3 Image Classifier
        </h1>
        <DropzoneArea
          acceptedFiles={["image/*"]}
          dropzoneText={"Add an image"}
          onChange={handleImageChange}
          maxFileSize={10000000}
          filesLimit={1}
          showAlerts={["error"]}
        />
        <Stack
          style={{ marginTop: "2em", width: "12rem" }}
          direction="row"
          spacing={1}
        >
          <Chip
            label={
              predictedClass === null
                ? "Prediction:"
                : `Prediction: ${predictedClass}`
            }
            style={{ justifyContent: "left" }}
            variant="outlined"
          />
          <Chip
            label={
              confidence === null ? "Confidence:" : `Confidence: ${confidence}%`
            }
            style={{ justifyContent: "left" }}
            variant="outlined"
          />
        </Stack>
      </Grid>
    </Grid>

    <Backdrop
      sx={{ color: "#fff", zIndex: theme => theme.zIndex.drawer + 1 }}
      open={loading}
    >
      <CircularProgress color="inherit" />
    </Backdrop>
  </Fragment>
);
As shown in the previous code block (line 9), we provided a callback function named “handleImageChange” to handle the onChange event for our DropzoneArea component. Since we have not declared the function yet, you’ll get an error if you try to compile the project.
In order to run prediction on our image, we will have to convert the image into tf.tensors format via the tf.browser.fromPixels function. This function accepts various types of input such as ImageData, HTMLImageElement and others. Refer to API documentation here.
Create async helper functions to load the uploaded image as HTMLImageElement:
const readImageFile = file => {
  return new Promise(resolve => {
    const reader = new FileReader();

    reader.onload = () => resolve(reader.result);

    reader.readAsDataURL(file);
  });
};

const createHTMLImageElement = imageSrc => {
  return new Promise(resolve => {
    const img = new Image();

    img.onload = () => resolve(img);

    img.src = imageSrc;
  });
};
Preprocessing on the input image will be required depending on the presence of data augmentation layer within the model saved. As we have utilized the “tf.keras.applications.MobileNetV3Large” API to create our model at the beginning of this article, we have to resize our image accordingly to the input_shape specified. The default model also expects floating points in the range of 0–255. Refer here for the mobilenet API.
Define the callback function to handle image change:
const handleImageChange = async files => {
  if (files.length === 0) {
    setConfidence(null);
    setPredictedClass(null);
  }

  if (files.length === 1) {
    setLoading(true);

    const imageSrc = await readImageFile(files[0]);
    const image = await createHTMLImageElement(imageSrc);

    // tf.tidy for automatic memory cleanup
    const [predictedClass, confidence] = tf.tidy(() => {
      const tensorImg = tf.browser
        .fromPixels(image)
        .resizeNearestNeighbor([224, 224])
        .toFloat()
        .expandDims();
      const result = model.predict(tensorImg);

      const predictions = result.dataSync();
      const predicted_index = result.as1D().argMax().dataSync()[0];

      const predictedClass = classLabels[predicted_index];
      const confidence = Math.round(predictions[predicted_index] * 100);

      return [predictedClass, confidence];
    });

    setPredictedClass(predictedClass);
    setConfidence(confidence);
    setLoading(false);
  }
};
To serve the web app locally, run the following command:
npm startYou should be able to see the rendered UI in your browser as shown below.
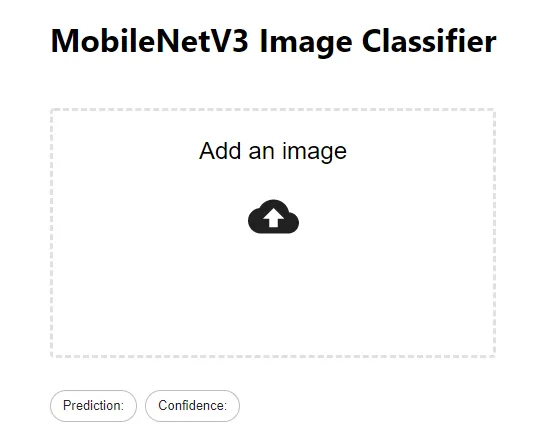
Interface to upload an image and show prediction result
Hosting web app on GitHub Pages
This section was referenced from gitname’s tutorial on deploying React App to GitHub pages.
Install additional dependency:
npm install gh-pages --save-devCreate a public repository on GitHub without initializing anything. Your username and repository name will be required later. Example below:
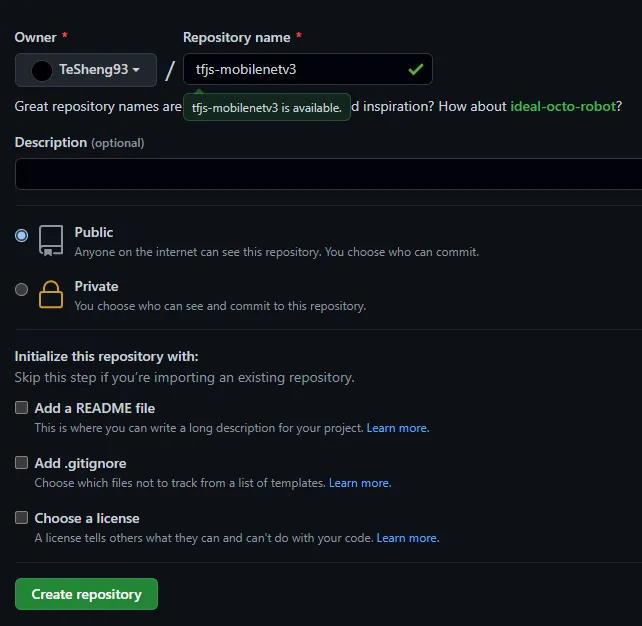
Leave the options at the bottom empty
Navigate to the package.json file in your project folder and add a “homepage” property with the string value of “https://{username}.github.io/{repo-name}”. For example “https://TeSheng93.github.io/tfjs-mobilenetv3” for my case.
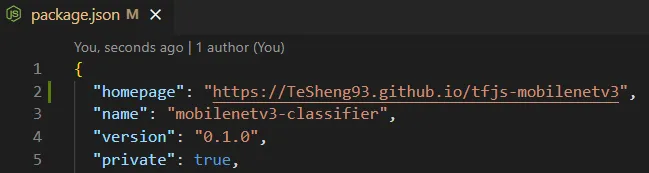
Top portion of package.json file
Add the following properties into the existing “scripts” property.
"predeploy": "npm run build",
"deploy": "gh-pages -d build"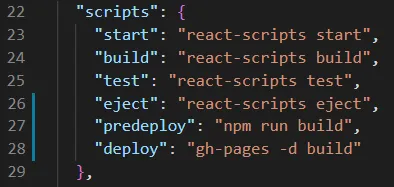
“scripts” property in package.json file
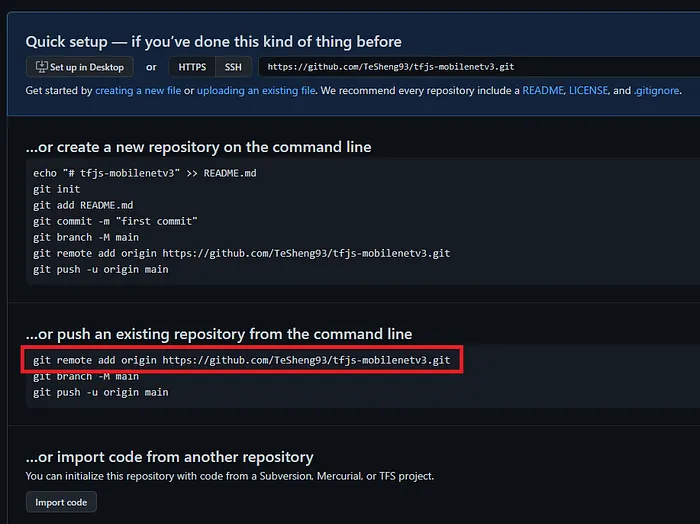
Since we’ve created our project via create-react-app, a local git repository has already been initialized. Replace the last portion of the following command with your own repository URL and execute it in a terminal to link the local repository to the remote.
git remote add origin {URL to git repository}The command can also be found on your GitHub repository page.
Press enter or click to view image in full size
Now execute the following command to build and deploy the app to GitHub Pages.
npm run deployOnce the deployment is complete, you will see a “Published” message in the terminal. Your react app is now published at the URL that you’ve specified in the package.json “homepage” property.
Press enter or click to view image in full size
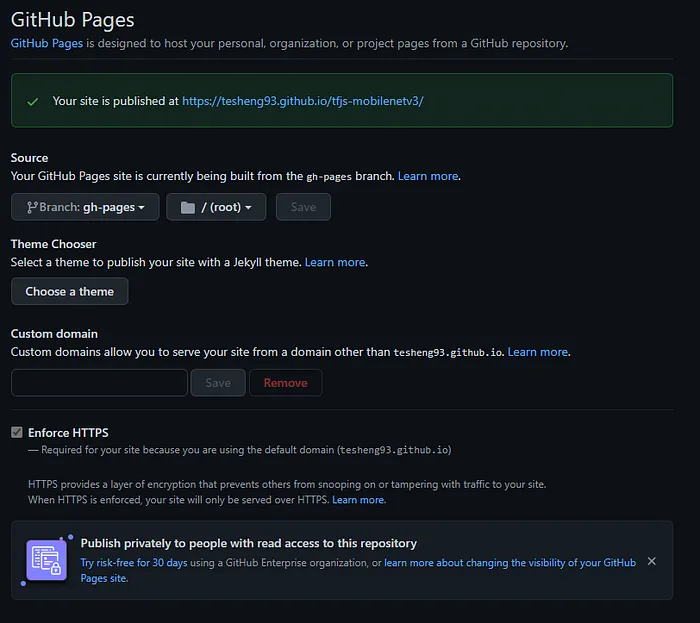
GitHub repository Pages settings
Click here to view the hosted web app and here for the repository.